dreyescat.github.io
Howtos, code snippets, comments, ...
Stuff I think it's worth to keep and might be useful to others
Set up a website with Github Pages
GitHub gives us the possibility to host our site for free with GitHub Pages. There are two types of pages, User/Organization Pages and Project Pages. As our goal is to create a personal website we will go for the User Pages option.
We can create Pages automatically or manually. The automatic option comes with a bunch of ready to use themes. In our case we are going to go step by step and start with a barebone setup.
Create the remote repository
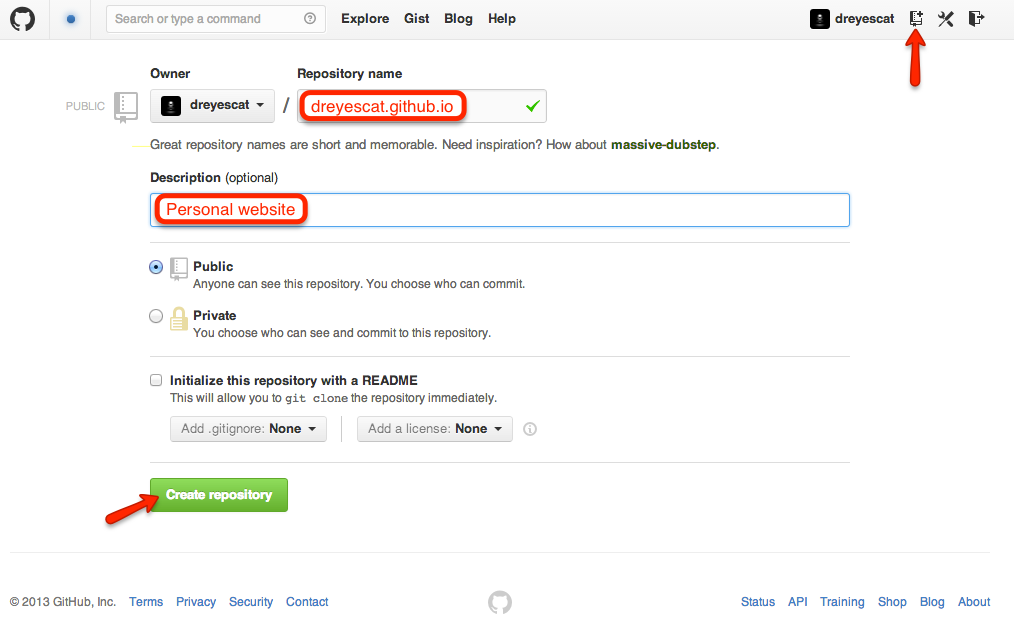
Regardless the option we choose, we need to create a repository dedicated to host only the Pages. It must be named exactly <username>.github.io (i.e. dreyescat.github.io). This name will correspond to the domain of our site (i.e. http://dreyescat.github.io).
Create the local repository
Once we have the remote repository we need some way to bind it to our local file system. Time to go to the command line.
First of all, we need to create a local repository to track the remote one.
$ mkdir dreyescat.github.io
$ cd dreyescat.github.io
$ git init
$ git remote add origin https://github.com/dreyescat/dreyescat.github.io.git
Add some stuff to our brand new repository. We can simply add a simple README.md file and push it to the remote repository.
$ vi README.md
$ git add README.md
$ git commit -m "Add simple README"
$ git push -u origin master
Configure Jekyll
Although it is not necessary, if we want to preview our site on local before publishing we will need to have Jekyll installed on our computer. Installing Jekyll on our machine its relatively easy thanks to the GitHub Pages Gem.
As GitHub Pages recommend, we are going to install Bundler for package dependencies and version management.
$ gem install bundlerNow that we have Bundler installed, we just need to create a Gemfile with the github-pages gem.
source 'https://rubygems.org'
gem 'github-pages'
With this gem configuration we just need to make bundle install all the requirements.
$ bundle installEverything is ready to run Jekyll on local.
$ bundle exec jekyll serve --watchOk. Now we have our site available on http://localhost:4000. The watch option watches for changes and regenerates automatically.
Nothing interesting yet. We do not have nothing to show yet.
If we are observant, we will realize that a _site folder has been created. By default Jekyll copies all the contents into this folder, in this case with three files, README.md, Gemfile, and Gemfile.lock inside.
None of those files are really intended to be served. So before even creating our first page we are going to prevent Jekyll copying those files. A new config file comes in, _config.yml. This file stores the Jekyll configuration. So let’s exclude those files. By the way, we are going to disable custom plugins because they won’t work. GitHub Pages disables plugins for security reasons anyway.
safe: true
exclude:
  - README.md
  - Gemfile
  - Gemfile.lock
Just to finish up our initial configuration we are going to git ignore the generated _site folder to prevent commit them into the repository. Simply we need to edit .gitignore.
# Jekyll generated site
_site
Now let’s commit our initial set up.
$ git add .
$ git commit -m "Set up initial configuration"
$ git push
This will add .gitignore, Gemfile, Gemfile.lock1, and _config.yml to the repo.
Now everything is ready to create content. Let’s start with a simple index.html homepage that just shows the list of all the available posts.
<h1>Recent Posts</h1>
<ul>
  {% for post in site.posts %}
  <li>
    <a href="{{ post.url }}">{{ post.title }}</a>
  </li>
  {% endfor %}
</ul>
As we can see it is not a regular html. We have some special tags. This is because in Jekyll we can use the Liquid templating language to process templates.
If we open http://localhost:4000 on the browser we will see nothing interesting yet. Just the Recent Posts header. This is because we have not written any post yet.
[1] For a good explanation of why we should check Gemfile.lock into version control see Clarifying the Roles of the .gemspec and Gemfile.